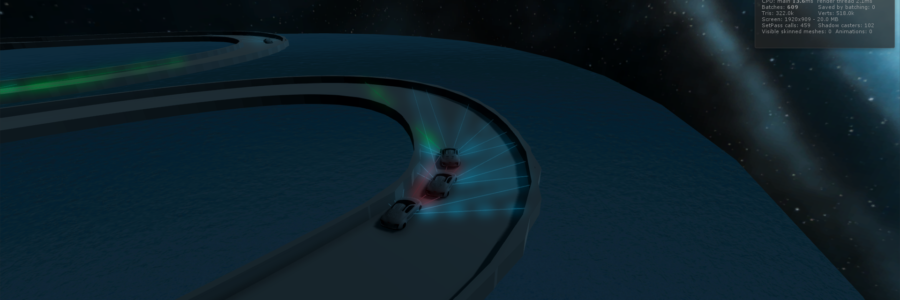
Self Driving Cars 3D Simulation
In this post you will learn how I have created this Self Driving Simulation with interesting features and innovative ideas that will help you to create your own autonomous car.
Apart from the effects of the simulation, this autonomous simulation has a lot of complex algorithms and neural networks behind it.
It’s developed in C# and Unity 3D and has some keys ideas to make this work. You can also learn some of the basic ideas and create a simple Self Driving Simulation in 3D here.
This are the most important key ideas for creating the project:
- Track System
- Car Sensors
- Neural Network
- Output movements (acceleration and rotation)
- Training: back-propagation and genetic algorithm
- Car DNA and JSON importer
- Environment and camera
TRACK SYSTEM
The track of the demo is made in Blender with bezier curves. In Unity 3D is a mesh that has a collider component.
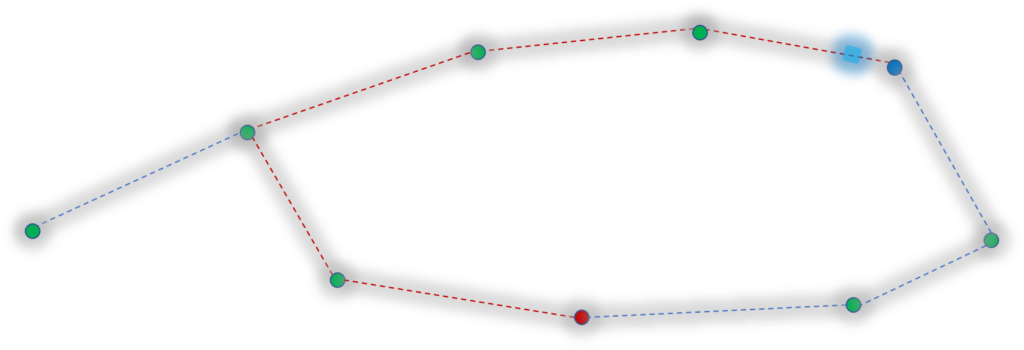
When the track is imported from Unity, some track points are added in game. These points will be in charge of localizing each car. They will be in the entire track.
Now we will understand how a car is tracked:
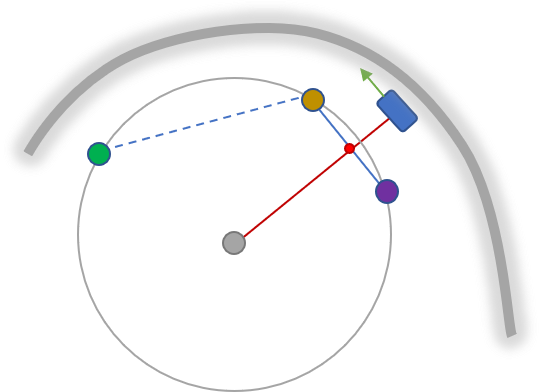
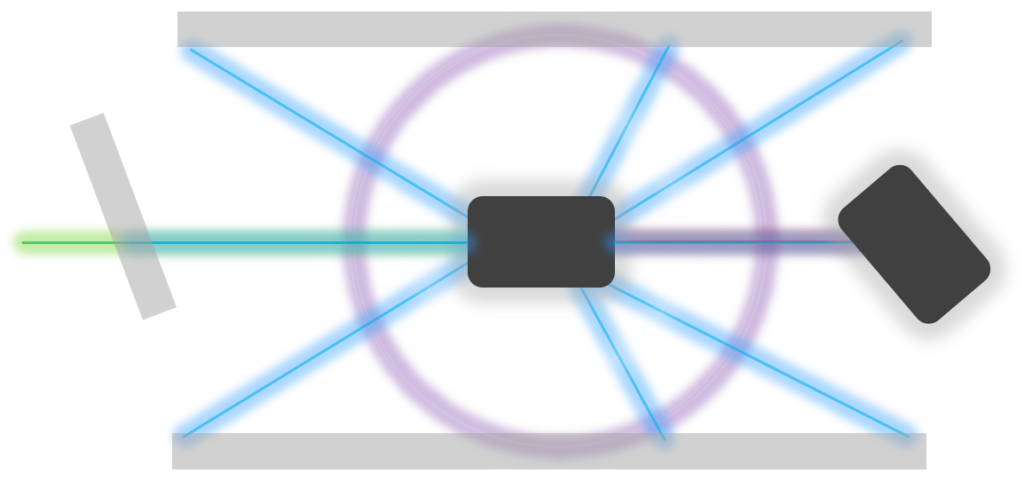
TRILATERATION
The track systems is similar to a GPS localization and will help to create navigation systems as a new feature of the application.
- We take the initial trackpoint where the car has been spawned. In this case denoted with the colour purple. With the next two points we will be able to trilaterate the position and calculate the point where the three points are with the same distance (center of a circunference).
- This centers will be calculated at the start of the simulation with the track points.
float v1 = x1 * x1 + y1 * y1;
float v2 = x2 * x2 + y2 * y2;
float v3 = x3 * x3 + y3 * y3;


float a = x1 * (y2 - y3) - y1 * (x2 - x3) + x2 * y3 - x3 * y2; ;
float b = v1 * (y3 - y2) + v2 * (y1 - y3) + v3 * (y2 - y1);
float c = v1 * (x2 - x3) + v2 * (x3 - x1) + v3 * (x1 - x2);


float xCenter= -b/(2f*a);
float yCenter = -c / (2f    * a);
Where x and y are the positions of the track points selected.
INTERSECTION
When all the center points have been calculated, on each update of the simulation we will calculate the intersection point of the line that joins the car and the center with the line of the current track point and the next point.
  public Vector2 intersection(float x1, float y1, float x2, float y2, float x3, float y3, float x4, float y4)
    {
        float pxN = (x1 * y2 - y1 * x2) * (x3 - x4) - (x1 - x2) * (x3 * y4 - y3 * x4);
        float pyN = (x1 * y2 - y1 * x2) * (y3 - y4) - (y1 - y2) * (x3 * y4 - y3 * x4);
        float pD = (x1-x2)*(y3-y4)-(y1-y2)*(x3-x4);
        return new Vector2(pxN / pD, pyN / pD);
    }
DISTANCE TRAVELLED
With the intersection calculated, the initial and current track point, we will calculate the distance.
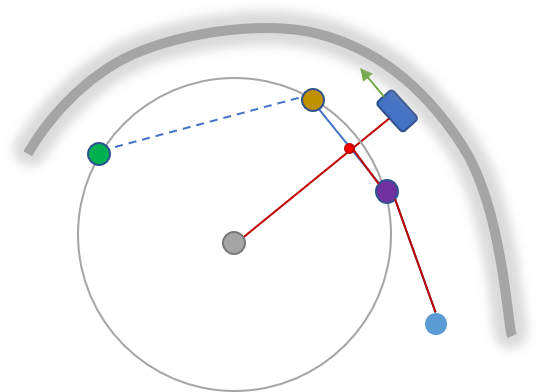
The distance in the image will be the red path.
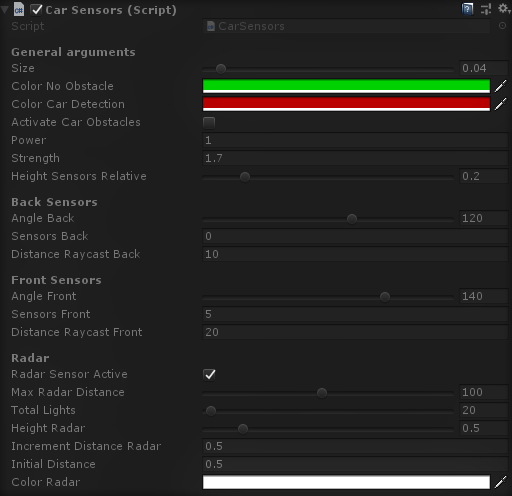
SENSORS
Each car will have some back and front sensors that will be the equivalent of the real LiDAR sensors. Each sensor will raycast the distance to the first object that could be a track or another car.
The output of the sensor will be the max distance of it divided by the collision point distance from the car. The output will be a value from [0-1]. If the sensor haven’t detected any object it will return 1.
This are the car sensors parameters in the editor:
NEURAL NETWORK
Each car will have a Feed-Forward Neural Network. This network will have a lot of parameters to edit such as the architecture or the initialization range.
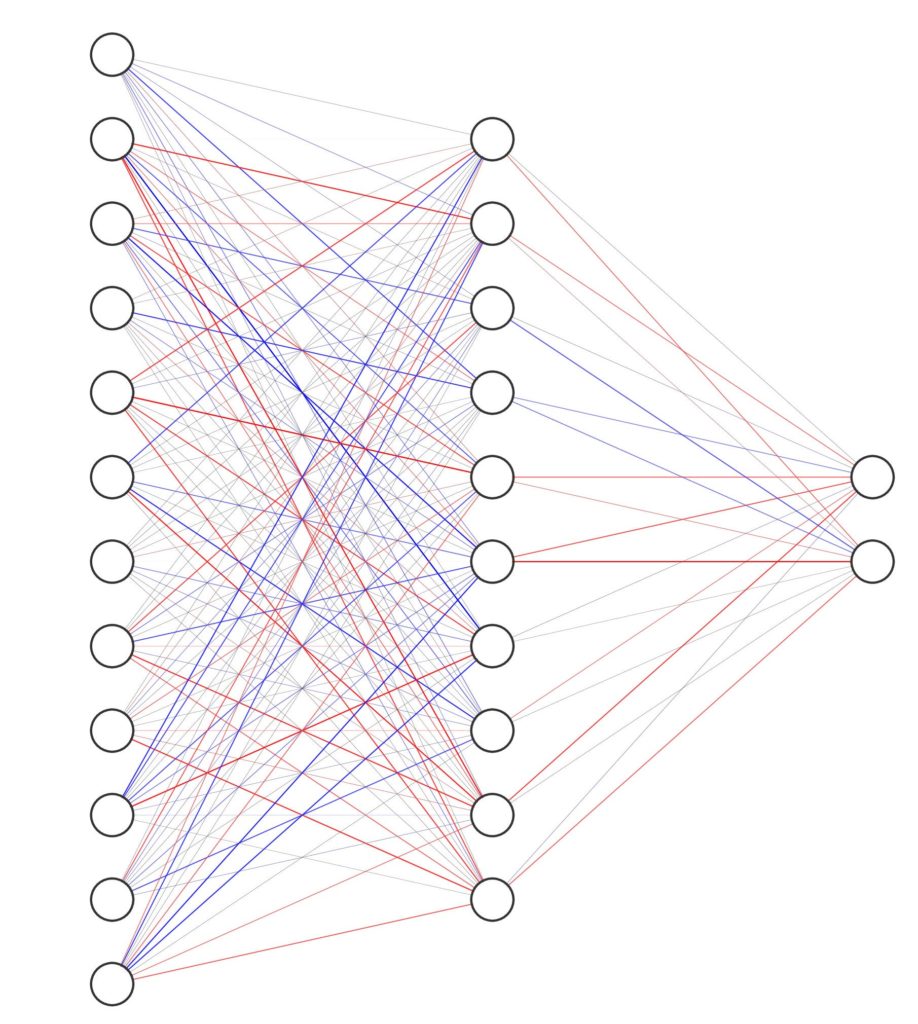
This architecture is similar to the neural network of a car. It will have as input the sensor data. Each sensor will have one neuron value if it only detects the track. However if the simulation also detect car collisions, the input data of a sensor will be two for each. The output will be always 2 because of the acceleration and rotation of each car. The hidden layers will vary and will be able to be customized by the user.
The architecture of the hidden layers can be edited:
[Header("Architecture Network")]
public int[] hiddenArchitecture;
Also the activation function can be selected from the sigmoid to the hyperbolic tanh and RELU:
[Header("Activation")]
public Activation activationFunction = Activation.Sigmoid;
The values of the weights, bias, neurons and error will be stored in different array:
  //Arrays
    private List<float[]> neurons;
    private List<float[,]> weights;
    private List<float[]> bias;
    private List<float[]> deltas;
    private List<float[,]> gradient;
    private List<float[,]>previousVariation;
The Neural Network class will have the feed-forward update method that will be charge of calculating the outputs with the input data and the weights values.
This is the feed-forward algorithm implemented in code:
for (int i = 0; i < neurons[0].Length; i++)
        {

            neurons[0][i] = inputs[i];
        }
        for (int i = 0; i < getLayers() - 1; i++)
        {
            float[,] weightsLayer = weights[i];
            float[] layerNeurons = neurons[i];
            float[] layerNextNeurons = neurons[i + 1];
            for (int j = 0; j < layerNextNeurons.Length; j++)
            {
                float sum = 0;
                for (int k = 0; k < layerNeurons.Length; k++)
                {
                    sum += (weightsLayer[k, j] * layerNeurons[k]+bias[i][k]);
                }
                layerNextNeurons[j] = applyActivationFunction(sum);
            }
        }
CAR MOVEMENT
Each car depending on the outputs will accelerate and deccelerate and also steer. Each car will be able to move in every direction and with different speeds. Also cars will have a rigid body to trigger the collisions with other objects ingame.
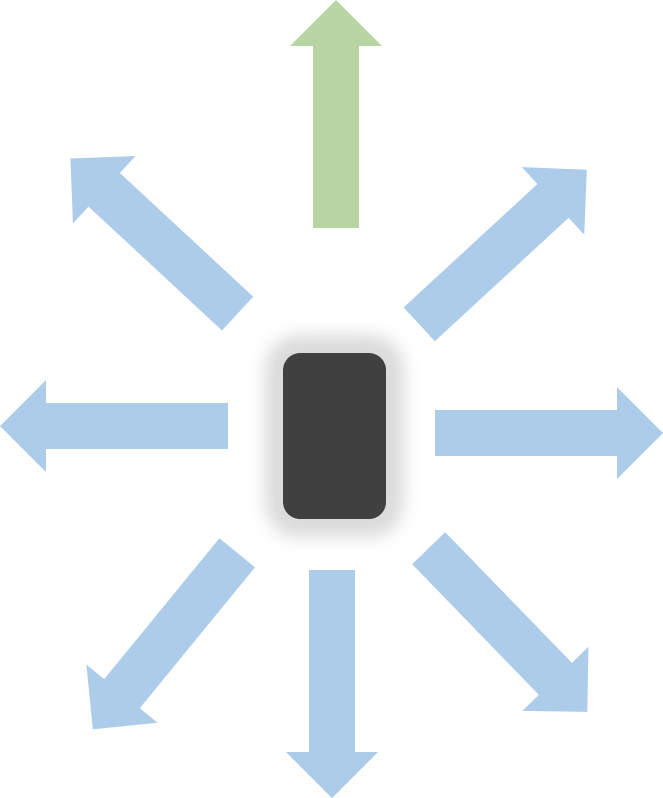
Depending on the values from [0-1] of the output layer we will need to manipulate them to get right and left rotations and also have gradual speeds. The simulation also helps the cars to have a speed limit.
//Rotation
            float rotation = outputs[0] * 2 - 1;

            transform.Rotate(new Vector3(0, (netConstantRotation * rotation)*Time.deltaTime, 0));

            //Acceleration
            if (applyAcceleration)
            {
                float accelerate = outputs[1] * 2 - 1;
                if ((speed) >= maxSpeed)
                {
                    if (accelerate >= 0)
                    {
                        accelerate = 0;
                    }
                }
                else if ((speed) <= minSpeed)
                {
                    if (accelerate <= 0)
                    {
                        accelerate = 0;
                    }
                }
                acceleration += netConstantAcceleration * accelerate;

            }
Each car will have two different modes. The autonomous mode where the movements will be predicted by the neural network or the manual mode. In this mode the car will be steered by the WASD control of the keyboard. This will help the car to learn of the movements of the car. We will be seeing this in the Supervised Learning.
LEARNING ALGORITHMS
ARTIFICIAL INTELLIGENCE
This is the most important part. When the neural network is initialized it will be completely random and the weights will need to be modified to get nice movements of the car and prevent the car from colliding.
There are different of artificial intelligence learning algorithms. In this simulation the Supervised Learning and the Reinforcment Learning are implemented.
REINFORCEMENT LEARNING – GENETIC ALGORITHM
One strategy for the car to learn is to use the Evolution Law of Darwin. You can get a deep explanation of this in this post of Genetic Algorithm. The overall idea is to get better individuals with different methods. The weights in this type or learning are called DNAs. This DNA will have all the important information of the car (the neural network learnable parameters).
In this image you can see the steps of the Genetic Algorithms to create new child cars from the parents (best cars):
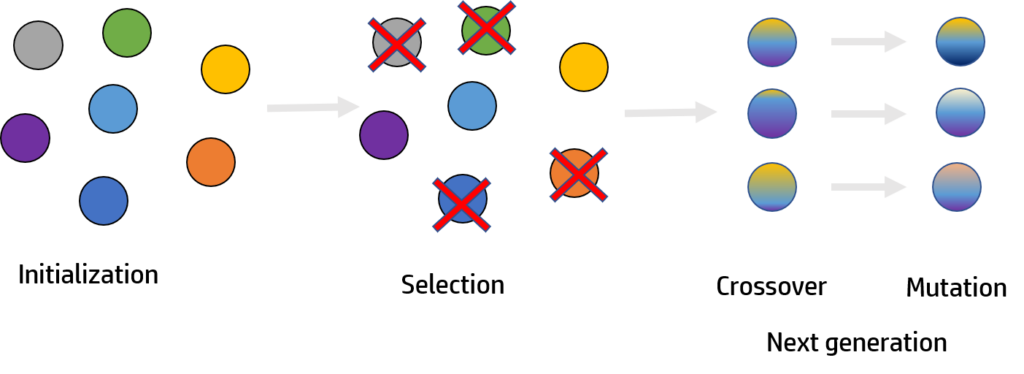
The best cars must be selected with the accuracy and the diversity of each car. The accuracy will be proportional to the distance travelled calculated in the track system of the car. With the accuracy we will calculate the fitness of each car that will help us to calculate the best cars.
Then a DNA some operation will be executed to create new childs that share DNA of their parents and also have little mutation changes.
Here you can change the code of the selection of the cars:
  GameObject[] highestCars = new GameObject[selectedCount];
        if (controller.cars.Count > 0)
        {
            for (int a = 0; a < selectedCount; a++)
            {
                //Get highest fitness of the cars that are not selected

                GameObject carMaxFitness = null;

                for (int i = 0; i < controller.cars.Count; i++)
                {
                    if (!controller.cars[i].GetComponent<CarController>().selected)
                    {
                        if (carMaxFitness != null)
                        {
                            //If a car has better fitness swap and set selected
                            if (controller.cars[i].GetComponent<CarController>().getFitness() > carMaxFitness.GetComponent<CarController>().getFitness())
                            {
                                carMaxFitness.GetComponent<CarController>().selected = false;

                                controller.cars[i].GetComponent<CarController>().selected = true;
                                carMaxFitness = controller.cars[i];
                            }
                        }
                        else
                        {
                            controller.cars[i].GetComponent<CarController>().selected = true;
                            carMaxFitness = controller.cars[i];

                        }

                    }
                }

                highestCars[a] = carMaxFitness;

            }


            for (int j = 0; j < highestCars.Length; j++) {
                selectedCars[j] = highestCars[j];


            }


            for (int i = 0; i < controller.cars.Count; i++)
            {


                if (!controller.cars[i].GetComponent<CarController>().selected && !controller.cars[i].activeSelf)
                {
                    Destroy(controller.cars[i]);
                    controller.cars.Remove(controller.cars[i]);

                }
            }


            for (int i = 0; i < controller.cars.Count; i++)
            {
                controller.cars[i].GetComponent<CarController>().selected = false;

            }
        }
SUPERVISED LEARNING – BACK-PROPAGATION
This is another way to learn. In this case with gradient descent algorithms. This is a much complex learning because it will try to learn with the movements of a human drived car. Because the Gradient Descent is a multidimensional problem, this learning won’t give us the assurance that it will give always nice trainings. It will also depend on the error we made with the control of the car.
The idea of the back-propagation algorithm is to edit the weights of the neural network to decrease the general error of the output data of the network.
This error will be calculated with the movements of the human controlled car. Then we will execute the Gradient Descent Algorithm to try to decrease this error.
Here you can see the calculation of the error signal:
//Output Layer error signal
        float[] outputs = getOutputs();
        for(int i = 0; i < outputs.Length; i++)
        {
            float delta = -(desired[i] - outputs[i])*applyDerivativeActivationFunction(outputs[i]);
            deltas[getLayers() - 1][i] = delta;
        }
        //Hidden layers error signal
        for (int i = getLayers() - 2; i >= 0; i--)
        {
            for (int j = 0; j < neurons[i].Length; j++)
            {
                float sumDelta = 0;
                for (int k = 0; k < neurons[i + 1].Length; k++)
                {
                    sumDelta += deltas[i + 1][k] * weights[i][j,k];
                }
                float delta = sumDelta * applyDerivativeActivationFunction(neurons[i][j]);
                deltas[i][j] = delta;
            }
        }
        //Calculate gradient with this error signals.
        calcGradients();
The adjustment of the weights of the neural network with this error signal is implemented here:
 public void adjustWeights()
    {

        //Adjust weights and biases
        for (int i = 0; i < weights.Count ; i++)
        {
            for (int j = 0; j < neurons[i + 1].Length; j++)
            {
                //bias[i][j] -= biasLearningRate * deltas[i + 1][j];

                for (int k = 0; k < neurons[i].Length; k++)
                {
                    float variation = weightLearningRate * gradient[i][k, j];
                    weights[i][k, j] -=variation;

                }
            }
        }
        //Reset array of previous gradients
        gradient = createGradientArray();
    }
To improve the performance of this algorithms, I have implemented some optimization algorithms: minibatch gradient descent and momentum.
To get better results with this algorithm, the initialization of the weights and how are they has a lot of importance for the movement to a local minimum of the Gradient Descent. It’s important firstly to get cars that works well in the track with the Genetic Algorithm learning and then get accurate results of the movements with the backpropagation.
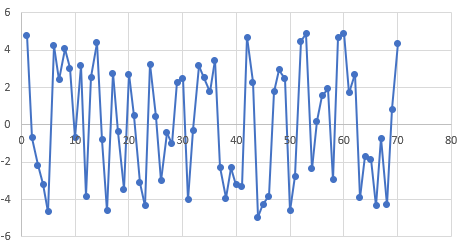
DNA AND JSON LOADER
The DNA contains all the weight data of the neural network. This DNA can be written to a JSON file to analyze this weights and also the accuracy of the cars and other variables. Also it will help to use a DNA to create the cars in another simulation.
In this fragment of code you can see how to import and export the DNA:
 public void exportJson(DNA dna)
    {

        string s = JsonUtility.ToJson(dna);
        Debug.Log(s);
       using (StreamWriter streamWriter = File.CreateText(Path.Combine(Application.persistentDataPath, fileName)))
        {
            streamWriter.Write(s);
        }
    }
    public DNA importJson()
    {
        using (StreamReader streamReader = File.OpenText(Path.Combine(Application.persistentDataPath, fileName)))
        {
            string jsonString = streamReader.ReadToEnd();
            return JsonUtility.FromJson<DNA>(jsonString);
        }
    }
View of DNA in chart:
ENVIRONMENT AND CAMERA
The scene has different game objects apart from the cars: the track and the camera as the main objects.
For the visual effects, the simulation includes glow effects, post proccessing, lighting and shaders.
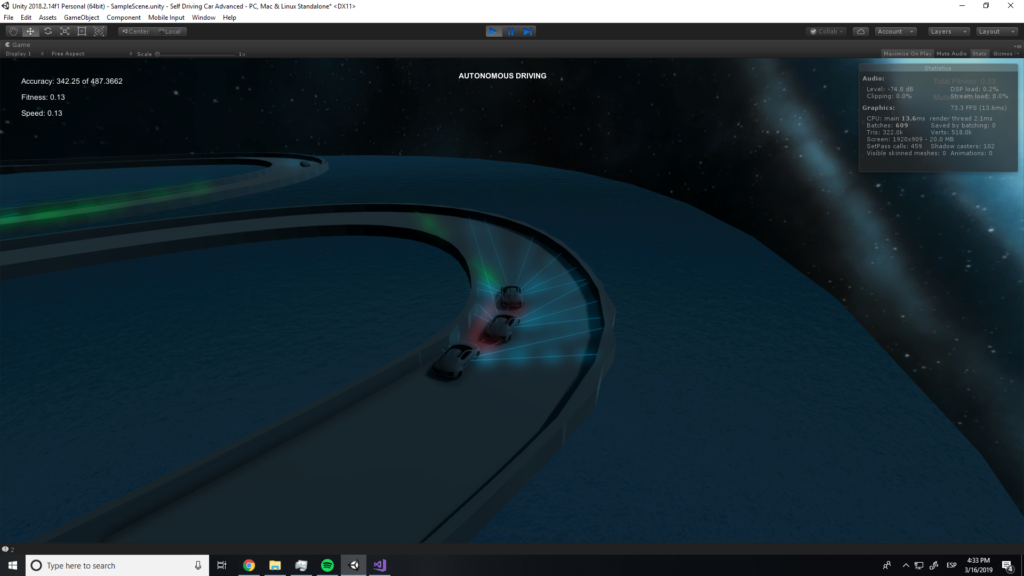
The camera follows the best car. You can turn this functionality off by locking the camera.
INTRUCTIONS FOR DOWNLOAD AND RESEARCH
The project will be able to download soon.
KEYS
Tab – Switch from autonomous mode to manual mode
R/T manage lighting
WASD manual car movement
Shift– Genetic algorithm generation
Control – Random generation
C – Lock/unlock camera
Z– Switch car
F – Save DNA in a JSON file in Appdata
Pingback: Self Driving Cars 3D Simulation | Multi News Worldwide Inc
Pingback: Self Driving Cars 3D Simulation | WWE- World Wide Experts
Pingback: Self Driving Cars 3D Simulation | Multi News TV
Is this project available to download via code member subscription?
In my YouTube channel you have available a simpler version of the simulation y the self driving simulation tutorials also available the simulation in my website retopall -> simulations. That specific simulation is not currently available. Sorry